
How To Voice Over a Video Like a Pro?
Have you ever wondered how watching storytelling videos or tutorials with voice over a video is so much fun?
Voiceovers are a powerful tool for enhancing video content, providing a professional and engaging touch. Well, welcome to the complete guide on how to record and edit a professional voiceover using Vidma Editor – the premier video and audio editing app. Whether you want to narrate a ‘How To’ video, produce an audiobook, or voice a commercial, this guide will walk you through the entire voiceover process step-by-step.
What is Vidma Editor?
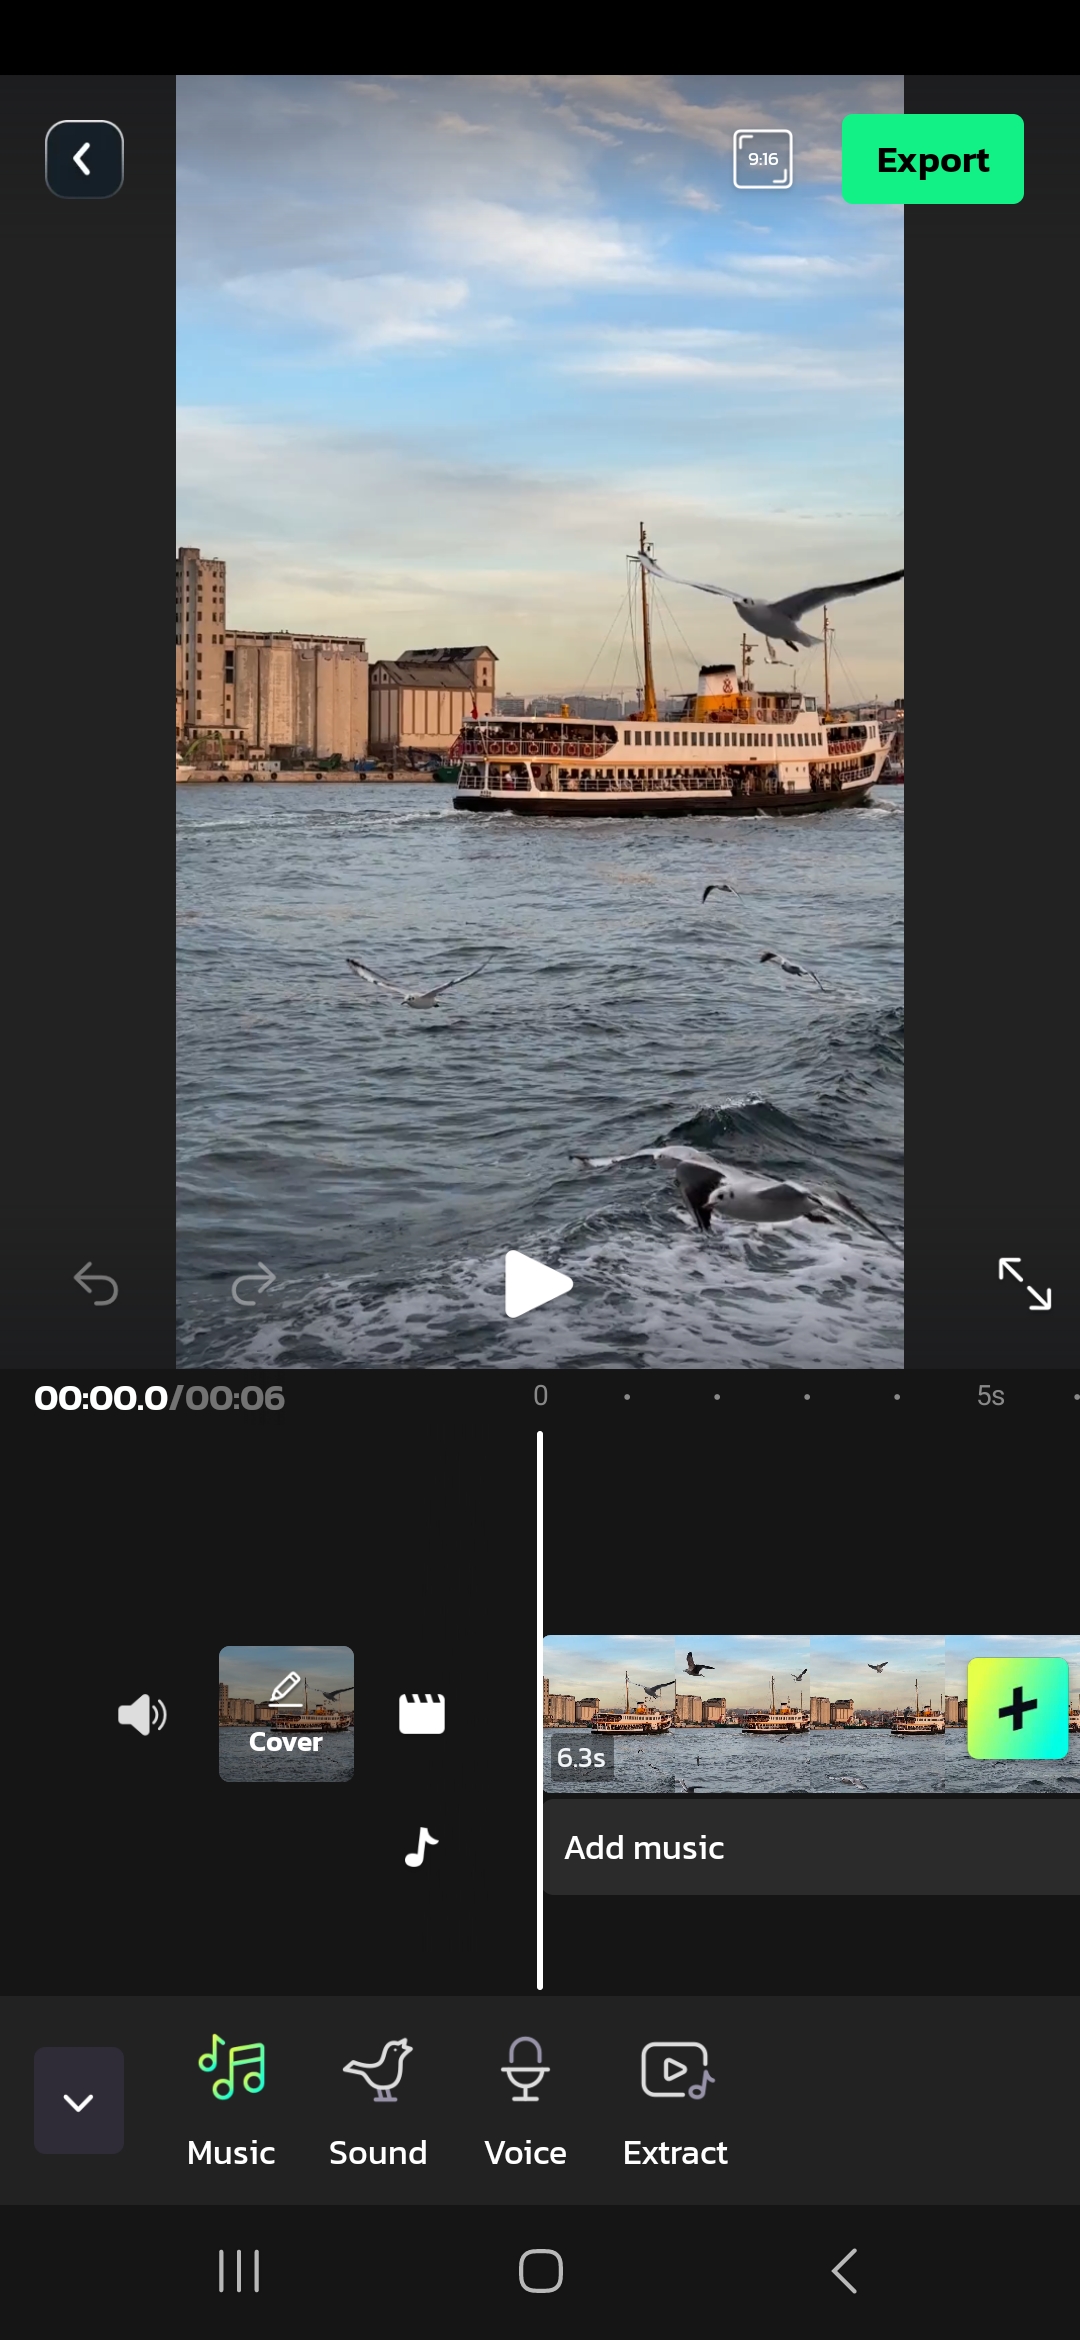
Vidma Editor is an intuitive yet powerful app that makes it easy for anyone to record, edit and enhance videos. Vidma Video Editor comes with functional editing features and a free resource library that empowers quick video editing on mobile and desktop.
Become a video editing master even if you’re a beginner in video editing – Vidma comes with an intuitive interface allowing you to create incredible music videos and social media content instantly by importing video clips, and adding texts & music.
How Voice Over App Helps To Optimise Audio for Videos?
Voice-over apps can be valuable tools for optimizing audio for videos in several ways:
- Easy-to-use audio recorder with advanced controls like input gain to optimize recording quality
- Range of voice effects like noise reduction, compression, equalization to polish and improve the audio
- Tools to edit the timing and pacing of your voiceover narration
- Ability to add background music and sound effects to enhance the production value
- Support for sharing the finished voiceover in multiple formats like MP3, WAV, M4A
With Vidma, you can produce broadcast-ready voiceovers that sound professional, without the need for expensive recording equipment or complex audio editing software.
4 Steps to Voice Over a Video
Voice over a video work can add depth and context to a video, enhancing its impact. Here’s a basic guide to voice over a video in four steps:
Step 1. Preparing for a Professional Voice Over
The preparation stage is crucial in determining the end quality of your voice over a video. It is not only your voice, but the message, story and the content of what you are trying to deliver. The prep before you voice over a video is super important for quality purposes. Here are some tips on preparing effectively:
Choosing the Right Script and Understanding the Tone
- Carefully review the script and understand the overall tone – whether it’s formal, conversational, dramatic etc.
- Make sure you’re able to articulate tricky words. Break them down phonetically if required.
- Time yourself reading the script to meet length requirements and pace the narration accordingly – Super Important!
- Mark up the script to remind you of tone changes, pauses required, emphasis on specific words etc.
- Practise and practise to get the tone, timing and dialect right.
Setting up the Recording Environment for Optimal Sound Quality
- Choose a quiet room without external disturbances and echo as we aim to eliminate unnecerary noise and focus on the words by the aurator. Cover sound-reflecting surfaces with blankets and shut your windows.
- Position the microphone about 4-6 inches away from your mouth and make sure it’s not too far and not too close.
- Wear headphones to monitor the input levels and prevent audio feedback.
Tips for Warming Up Your Voice and Avoiding Common Mistakes
- Do vocal warm ups like gentle humming to open up your vocal tract before recording.
- Stay hydrated by sipping room temperature water during the session.
- Avoid common mistakes like vocal fry, mouthing words, hissing sibilants, popping plosives.
- Record samples, re-listen, and re-record if necessary until you nail the desired tone and articulation.
- PRACTISE, PRACTISE AND PRACTISE!
Step 2. Exploring Vidma’s Voice Effect Editors
Vidma provides a suite of advanced audio editing tools to enhance your voiceover and achieve a polished, professional sound.
Overview of the Voice Effect Editors Available in Vidma
Vidma allows you to apply the following effects to your voiceover with precision:
- Noise Reduction: Eliminate background noise like hums, fans, traffic etc.
- DeEsser: Reduce harsh sibilants like ‘s’ and ‘t’ sounds.
- Equalizer: Boost or cut specific frequency ranges for desired warmth and clarity.
- Compressor: Balance out volume differences and amplify soft sounds.
- Chorus: Thicken up the voiceover and make it sound richer.
- Reverb: Add a sense of space by simulating room acoustics.
Step-by-Step Guide on Using Different Voice Effects for Various Purposes
Let’s see how we can use Vidma’s voice effects for voice over a video:
1. Enhancing Clarity and Reducing Background Noise
- Go to the Audio Effects menu and add the Noise Reduction effect. Set Noise Reduction Strength between 3-6 dB for clean results.
- Add a subtle Compressor (Ratio: 2-3) to amplify softer sections and add density to the voiceover.
- Use the parametric Equalizer to boost (max +3dB) the 1-5 KHz range slightly for added clarity and intelligibility.
2. Adding Character and Emotion to the Voice
- For a richer, more intimate sound, add Chorus effect with low Depth around 15-30%.
- Use the Equalizer to boost 100-200 Hz range slightly to add depth and boost 1-2 KHz for brightness.
- Adding mild Compression makes the delivery more dynamic. Set Ratio between 1.5-2.5 and Threshold around -20 dB.
3. Creating Special Effects like Echo and Reverb
- For voiceovers set in large spaces, use the Reverb preset “Large Hall”. Adjust Wet/Dry mix to taste.
- Use Delay effect to produce voice doubling or an echo. Set time to 100-200 ms and feedback to 3-5 repeats.
4. Adjusting Pitch and Speed for Creative Voiceovers
- Change the Pitch setting (-12 to +12 semitones) for cartoon-like or monstrous voices.
- Speed up or slow down the voiceover (-50% to +100%) for dramatic effect. Use compressor to smooth out artifacts.
Step 3. Editing and Polishing the Voiceover
Once you’ve applied Vidma’s voice effects, further edit and polish the voiceover using these tips:

Tips for Editing the Recorded Voiceover in Vidma
- Trim out any dead air and unwanted sections like false starts, throat clears etc.
- Use crossfades between edits to smoothly transition between takes.
- Adjust the pacing and rhythm of the narration by trimming or extending pauses.
Utilizing Vidma’s Voice Effect Editors to Fine-tune the Audio
- Do multiple passes with the Noise Reduction effect for perfectly clean background.
- Use subtle DeEssing (max -3dB attenuation) only on problem sibilants avoiding over-processing.
- Automate the compressor dynamically during loud and soft passages.
Balancing Sound Levels and Adding Background Music/Sound Effects
- Ensure the voiceover audio peaks around -3dB to -6dB for optimal loudness.
- Add background music tracks at lower levels (peak -18dB to -12dB) below the voiceover.
- Insert sound effects like SFX beds underneath quieter voiceover passages.
Step 4. Finalizing and Sharing the Voiceover
The last stages involve exporting the voiceover from Vidma and publishing it:
Exporting the Finished Voiceover from Vidma
- Go to Project Settings and select an export audio format like M4A or WAV.
- Choose 16-bit or 24-bit depth and a 44.1kHz or 48kHz sample rate for optimal quality.
- Select High or Lossless quality setting when exporting.
Choosing the Appropriate File Format and Quality Settings
- For uploading online, use MP3 format at 192 kbps joint-stereo setting.
- For CD or broadcast use, export as WAV files in 16 or 24-bit / 44.1 or 48 kHz.
- For previewing on mobile devices, AAC format at 256 kbps works well.
Platforms and Mediums to Showcase Your Professional Voiceovers
- Upload to platforms like YouTube, Vimeo, podcast networks as multimedia voiceovers.
- Extract just the audio as MP3s and publish as audiobooks or podcasts.
- Use in video ad content for social media and online video campaigns.
- Burn onto CDs as audio samples for voiceover work applications.
Conclusion
And that concludes our complete guide on producing professional voiceovers from end-to-end using Vidma’s extensive audio editing capabilities. With its intuitive interface, versatile effects and comprehensive audio toolset, Vidma app enables you to record stunning voiceovers that sound studio-quality right from your phone or computer. Give your voiceovers the polish and sheen they deserve!
Happy Editing!
Related Posts


